Yes, it’s cool. But then what?
Chasing DX is exciting! Who can’t relate to the thrill of the hunt; the sense of accomplishment when you crack a pile up and add that exotic land to your trophy case? And of course, the bragging rights. But let’s be honest: In the context of emergency and even non-emergency communications, there’s seldom a genuine “need” to talk to a station thousands of miles away. DX is cool and fun, for sure. But for the average person is it really useful or practical? Near vertical incidence skywave (NVIS) fills in the gap between local communications and DX and is one of the most under appreciated forms of HF radio.
What is NVIS?
It is probably better to start by talking about what NVIS isn’t. It’s not a specific mode. Any operator can apply the principle to voice, code, or data. You do not need specific equipment. You can use whatever HF radio you’ve already got. As for antennas, a simple wire antenna will do. There is no need for towers, beams, or specialty hardware.
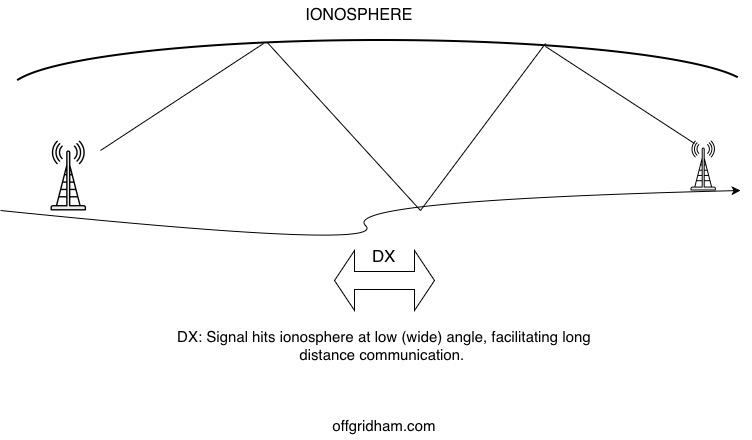
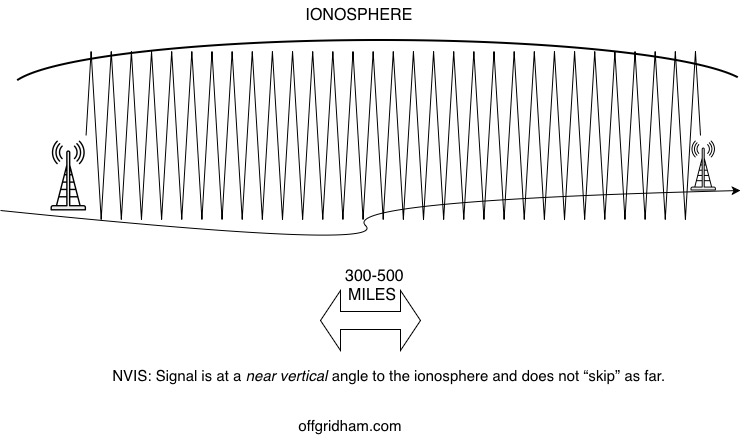
NVIS is simply sending a signal deliberately intended not to “skip” great distances. To send an effective DX signal, one must transmit at low wide angle to the ionosphere. In NVIS, the signal is sent at a very sharp, acute angle, almost ninety degrees. That’s where the “near vertical” part comes from.
Think of it like throwing a ball while inside a large building. In the first attempt, you throw the ball at an angle nearly parallel to the floor, like pitching a baseball. The ball will hit the ground, then bounce off the ceiling, and travel a fairly long distance. For the second attempt, you slam the ball on the ground in front of you at nearly a ninety degree angle. The ball will bounce many times between the floor and and the ceiling but not travel very far from where you threw it.
This is how NVIS works. By “throwing” the signal at an acute angle, it by nature will not travel as far.
ORIGINAL OFF GRID HAM GRAPHIC ©2026
ORIGINAL OFF GRID HAM GRAPHIC ©2026
The advantages of NVIS.
NVIS is perfect for filling the gap between local VHF/UHF and DX. For those concerned with survival/preparedness/emergency communications, you probably will not have a need to run DX. But regional comms in the 300-500 mile range would be practical and useful.
Since NVIS intentionally discourages DX transmissions, it also by default discourages DX reception. This translates into less noise and interference. It’s like having a built-in filter on your receiver.
Implementing NVIS.
Here’s the good news: Implementing NVIS does not require a specific radio and may not require a special antenna. Beam antennas, verticals, and any antenna mounted more than 1/3 wavelength above the ground are poor choices because they are designed to foster a wide angle for DX.
There are NVIS-specific antennas, but they’re not required. Dipoles, inverted V’s, and similar wire antennas mounted 0.1 to 0.25 wavelengths above the ground will perform very well. That’s good news! No big-budget towers or complicated hardware. Just a simple modestly-elevated wire antenna is all you need. You might already have an optimal NVIS setup and not even realize it.
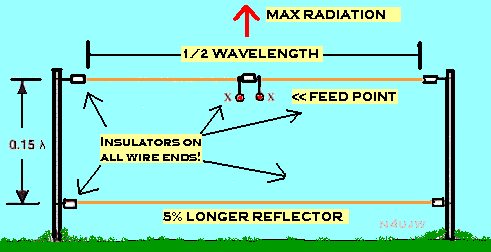
PHOTO 1. COURTESY HAMUNIVERSE.COM
Frequency matters.
One quirk about NVIS is that the frequency range it will work in is tighter than it is for DX. The maximum usable frequency (MUF) is the highest frequency that the ionosphere will reflect back to earth. Any signal above the MUF will pass through the ionosphere and out into space. There is also such a thing as lowest usable frequency (LUF), but that’s not important right now.
The MUF changes depending on your location, atmospheric conditions, sun activity, time of day, and weather. Determining the exact MUF can be difficult. However, there are a few tips to get you pretty close:
- Start at the bottom of the band and tune up. The point at which you stop hearing distant stations is probably the MUF; there may be a noticeable drop-off in noise/static. You can also use WWV. If you hear WWV strongly at 5.000 mHz but not at 10.000 mHz, the MUF is likely somewhere between those points.
- There are numerous online calculators and maps that will compute MUF in real time. I don’t know the methodology used to create the data so I can’t confirm how accurate they are, but from experience they seem to get it right.
- Lastly, a good general guideline is to use 40 meters during the day and 80 meters at night. One or both of these bands is almost always good for NVIS. You can of course experiment with other bands but the physics of NVIS make operation above 40 meters a hit-and-miss proposition. The MUF for effective NVIS will be lower than the MUF overall.
Testing the system.
As we always always always preach here on Off Grid Ham, you don’t just acquire resources and stash them away and hope everything will be good when the time arrives, right? Test your NVIS setup before you genuinely need it. Preferably, conduct both night and day tests. If you can hear stations in the 300-500 mile range, but no DX, you’re doing great. On the transmit side, a good way to test your system is to check into a net. When your turn comes up, politely explain what you’re doing and ask for signal reports. You will hopefully receive several responses that will give you an excellent idea of how your NVIS station is performing.
With my NVIS system, I can consistently work stations in the 200-500 mile range, usually on LSB, and get solid signal reports with just a five watt radio. QRP is excellent in this application. Since you’re not whipping a signal thousands of miles, and not having to punch through as much interference, you can get away with using less power.
It’s so easy, so why not do it?
NVIS is very useful for hams concerned with disaster/SHTF communications. For everyone else, it’s a good way to add versatility and function to your radio activities. If you never considered NVIS, it requires very little effort or dedicated equipment. While it lacks the “brag factor” and impressiveness of rare DX, it nevertheless earns its place in the menu of ham radio options.
Great article. Will need to try
I hope this article was helpful. And yes of course give it a try! Thanks for stopping in.
Nicely and simply put. A good read.
Thanks, Jed!
CHRIS,great article on Nvis,we have been going test on 60 m band at each soleste sorry poor spelling.and we have had great success in getting amateur radio operators to try this band.
We are located on Vancouver island,we had contacts as far PrinceGeorge and south to Portland,so an interesting band to experiment with.
Ve7gde
Hi Jack, thanks for checking in. I’m glad you are finding success on 60 meters. The most effective bands for NVIS are generally assumed to be 80 and 40, so 60 fits nicely in that window.
Nice article, and a good reminder that the modest stations and antennas set up by many residential hams are already ideally configured for NVIS Communications. Besides the wire antenna is mentioned, most vertical antennas, especially ground mounted with good radial systems, are excellent for NVIS.
Hi Dave, thanks for stopping by. You are exactly right. Many hams already have a great NVIS setup and don’t know it.
Those stuck with attic antennas and similar “stealth” stations have some options!
Many hams do already have a great NVIS setup… especially if using dipoles that are lower than they “should” be on the typical NVIS bands. Given NVIS works best with transmitted signals in the 60-90 deg takeoff range any low horizontal-ish antennas like dipoles, inverted Vee’s, and similar are best. Verticals produce a null in the very range you need for regional comms (beyond ground wave), are pretty impractical for the lower bands without coil loading (plus the resulting loss of bandwidth), and are the wrong choice for NVIS.
I’ve seen a lot of online “sources” spreading the utility of NVIS on higher bands with vertical antennas lately. Hate to see bad info lead people astray when the math (and ionosphere) simply don’t support the claim(s).
When you’re ready to really dive into NVIS to see what it is, how it does (and doesn’t) work, and the best ways to leverage this method search for articles and publications by Ben Witvliet, PhD. His work studying this topic and helping world wide humanitarian organizations to utilize this approach are incredibly informative.