When you want it now. off grid ham quick start
I recently received an email from a reader who suggested that I write an article about how a newcomer to off grid radio can get started: Batteries, solar panels, etc. I was like, wait…whaaaat? Off Grid Ham is not a blog about model railroading. This entire website describes in deep detail exactly how to get off the grid. off grid quick start guide
The reader’s sincere but out of touch request got me thinking. Many people like to jump into a new activity feet first and sweat the details later. Think of it like a “learn as you go” approach. While this method of learning does not work if one aspires to be a heart surgeon or an airline pilot, for amateur radio it can be very effective and fulfilling. So, for those who want to hurry up and get into it without digging through 127 articles, this one’s for you! In one blog article we’ll define the needed hardware and how to set it up. I do hope you’ll come back later and absorb everything else here on Off Grid Ham. To do more than the bare basics you’ll have to put some effort into elevating your skills. off grid ham quick start
The solar panel. off grid ham quick start
There are three primary types of solar panels: Mono crystal, poly crystal, and thin film. There are subtle operational differences between them. For first timers, it does not really matter which type you get because they are all very effective. The size of the panel you need will depend on the size of the battery you will be charging with it and your anticipated load. One watt of solar for every amp-hour of battery will get you by in most situations; two watts or more per amp hour preferred. It’s important to understand that a solar panel will very seldom produce its full rated power due to varying sun conditions. Having a larger panel helps offset these inconsistencies. off grid ham quick start
The solar charge controller.
A “12 volt” solar panel actually produces around 17 volts. That voltage can vary with the sunlight level, so something is needed to smooth it all out. That’s what a solar charge controller is for. It is wired between the panel and the battery so the battery will always see a steady 12 volt charge. There are different types of controllers. Pulse width modulation (PWM) controllers are less expensive but also less efficient. Maximum power point tracking controllers (MPPT) are very efficient but also very expensive. For small systems, PWM is the best option. You won’t get your money’s worth out of an MPPT controller unless you have a higher powered system with multiple panels.
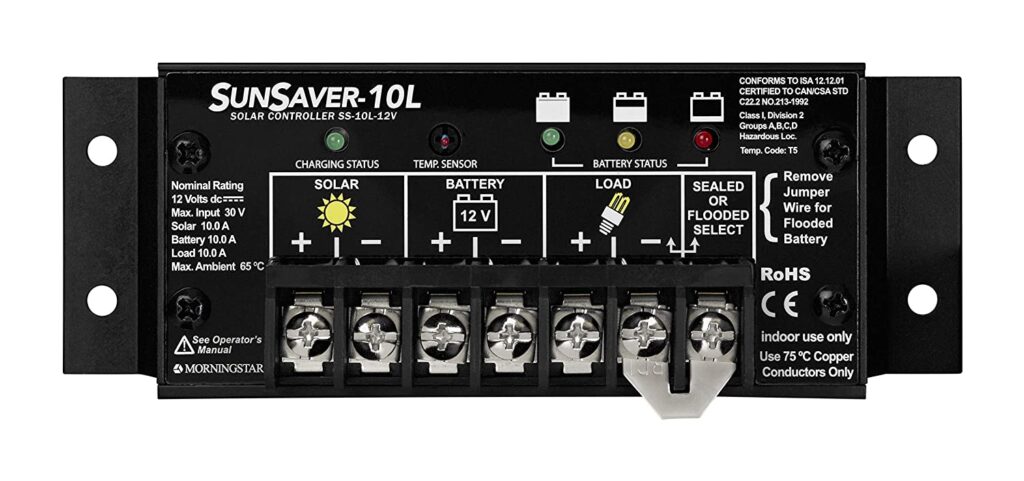
Do not get the cheap sub-$15 no name brand controllers found everywhere on line unless you’re on the barest of bare bones budgets or you’re just informally experimenting with solar. Stick with name brands like Morningstar, Victron Energy, and others. Morningstar in particular makes the fantastic SS-10-12V (about $68 on line). This model has been in production for decades and is a proven workhorse. It’s a 12volt/10 amp PWM controller that is small and easy to use for a first system but has room for expansion. For $83 you can get the SS-10-12V with the optional low voltage disconnect. Low voltage disconnect (LVD) will shut off power to your radio if the battery voltage drops too low. This prevents damage to the battery.
The battery.
The most common batteries used by off grid hams is the absorbed glass mat (AGM) and sealed lead acid (SLA). AGM and SLA are similar in design, physical size & weight, and cost. Lithium batteries are far and away the latest and best battery technology available to hams, but as you can guess, the most expensive. Lithium batteries are much lighter than other types and provide stable voltage for a longer time than anything else out there. Last in line is flooded batteries. Flooded batteries are not recommended except in permanent, non-portable installations because they contain acid that can easily spill.
Lithium batteries must be used with solar controllers specifically designed for them. None of the Morningstar SS series controllers are lithium-compatible. I use a Bioenno Power SC-122420JUD on my lithium. It goes to 20 amps and has a useful LCD status display. At $49.00 it’s the best bang for the buck controller for lithiums you’ll find anywhere. Bioenno products are highly respected in the amateur community.
Batteries can be complicated.
You’ll also need to have an idea of how much battery capacity you will need. There are a lot of variables involved. How much current does your rig pull on transmit and receive? How much transmitting as compared to receiving are you expecting to do (duty cycle)? Radios draw the most current on transmit, but you will not be transmitting 100% of the time. You may want a bigger than average battery to power your radio through extended periods of reduced or no sunlight. The catch is that the more battery capacity you have, the more solar capacity you’ll need to charge it in a decent amount of time.
Putting it all together.
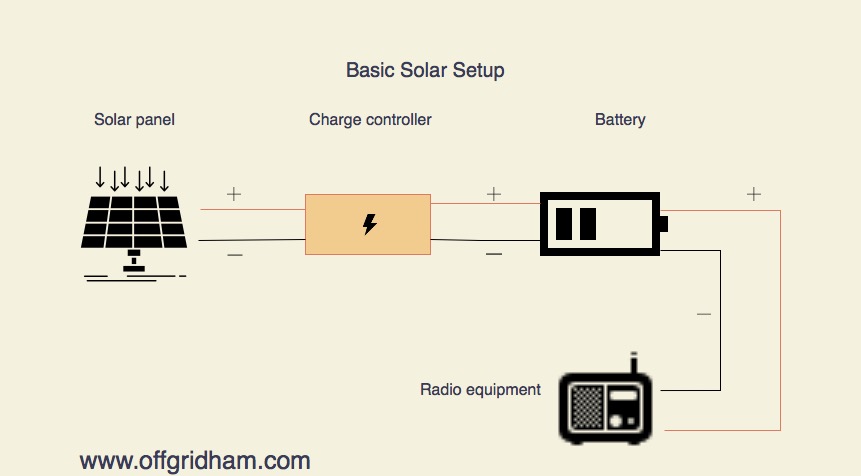
How do you wire it all together? That’s the bottom line everyone is in a hurry for, right? It’s actually very simple. Here ya go:
Some controllers have “LOAD” terminals for supplying power to your radio instead of connecting your radio directly the battery. This feature is omitted from the diagram above. For the purpose of powering your radio, there is no functional difference between the battery and the controller terminals unless your controller has the low voltage disconnect (LVD) option. In that case, you must connect your radio & accessories to the LOAD terminals or the LVD function will not work. If you do not have/are not using LVD, then it does not really matter if you connect to the terminals on the controller or directly to the battery.
About radio frequency interference (RFI).
PWM and MPPT controllers have to potential to produce RFI. One way to mitigate this is not to buy cheap junk in the first place. The budget models always cut corners, and you may well hear that discount price it in your receiver. This is one of the differences between a $9.00 controller and a $90.00 controller. All Morningstar SS series controllers have a modification the end user can perform to slow down the switching frequency to reduce RFI (details are in the manual), but you’re not likely to need it. Having a “good” controller is not a guarantee that you wont experience RFI, but it greatly reduces the chances of a problem.
What’s next?
This article is intended to be an off grid ham “quick start guide” so a lot of detail was omitted. There is enough information here for anyone to get their off grid system working without paging through lengthy manuals. This assumes you already know or at least have a pretty good idea of what hardware you will need. What is left out is important issues such as, how big should your battery be? What are the different types of controllers and solar panels? Links to previous Off Grid Ham posts that expand on these subjects are linked at the end of this article.
Resources.
Information about the difference between PWM and MPPT solar controllers.
Information about lithium batteries.
Understanding Absorbed Glass Mat (AGM) batteries.
How much battery do you really need?


In 2020 our club was unable to set up our normal Field Day station and we were all going it alone. By the time we knew the plans had changed it was getting a little late for improvising. I picked up a 1500 WH power pack (the Bienno Power BPP-H1500, but identical models can be found all over). This is an “all in one” device that contains a charge controller, LiPO battery pack and 1000 W inverter. Even with two old 30 Watt panels and less than ideal Sun I was able to run for about 16 hours of light duty using an older laptop and IC-9100 (with the 1200 MHz module disconnected). I did need to use the inverter and a 20A switching PSU but that wasn’t a problem at all. Just to be sure I also made up some AC power cables with Palomar Engineering common mode noise filters, which worked well on all but 75 and 160 Meters. I have since upgraded the solar panels to two 100 W folding solar panels which should provide continuous duty in the Colorado summertime.
Go ahead and call me an appliance operator, but it does the job, is much easier to transport than the various plasitc “go box” battery cases and sets up in minutes. It also has a basic status display, USB A & C, and also a 12V DC port. All came in handy while operating at night or just stringing LED lights around the camp site.
If you’re an appliance operator than so am I. I did exactly the same thing. I picked up a deal off Woot a year or so ago, an all in one battery pack with controller, various ports to power USB, and 12V devices, and an AC inverter, along with a matching folding solar panel. The whole thing didn’t cost much more than building my own out of bits and pieces, and the whole thing is plug and play and has worked well ever since. Could I have paid less if I’d built it from parts? Well, yeah, but when I factored in the amount of time needed to put everything together, hunt down parts, etc. the package I ended up with was probably actually cheaper.
KC9YGN
I used to be sour on the plug-and-play “solar generators” and have even written about my dislike several times on this website. However, lately I’ve reconsidered my position. As the technology gets better and cheaper those package deals become more and more practical & affordable. While I’m still a DIY guy and don’t use commercially made “solar generators” myself, for some people they are a great off grid power solution.
Chris,
Thanks for the quick start guide. Keep up the posts.
Merry Christmas, and may the new year bring us all health, wealth and the well earned wisdom of age.
Regards,
KY4KK
Thanks for your support Keith. Merry Christmas/Happy New Year to you as well.