That day will come.
Those who depend on large storage batteries for their off grid needs dread the day they need to be replaced. It’s expensive, time consuming, and potentially dangerous.
Common deep cycle flooded storage batteries bought at retailers will last about 2-3 years if used daily and maintained correctly. An AGM battery will go longer, maybe 5-6 years. Lithium batteries could go even longer, for a price not too many amateurs can pay. The bottom line though is that storage batteries have the shortest service life of anything in your off grid power system and there is almost nothing you can do about it.
This should be of great concern to survivalists and preppers. Unless you have a large stockpile of storage batteries as part of your long-term SHTF provisions, the day will arrive when your otherwise very well planned off grid power system will go totally dark due to the one thing you could not control: The relatively short life cycle of batteries.
With some forethought and care, installing new storage batteries does not have to be major drama. It’s the kind of job that’s somewhat easy to do, but also easy to mess up.
Before jumping in…
I’ve gone over battery safety several times on this blog, so I’m not going to rehash it again here. The rest of this article will assume you are following proper safety protocol. We are also assuming 12 volt storage batteries wired in parallel.
Hopefully your storage batteries are in a location that is easy to access. If they are crammed in a corner with a lot of random junk on/around them, take this opportunity to clean up and make a commitment to keep it that way. If they are in a place that is awkward to access, consider relocating them entirely.
My solar power system is in a small utility closet. There’s not a lot of room to work in there, so I keep my batteries on modified furniture dollies that can easily be pulled out into an open area for servicing.
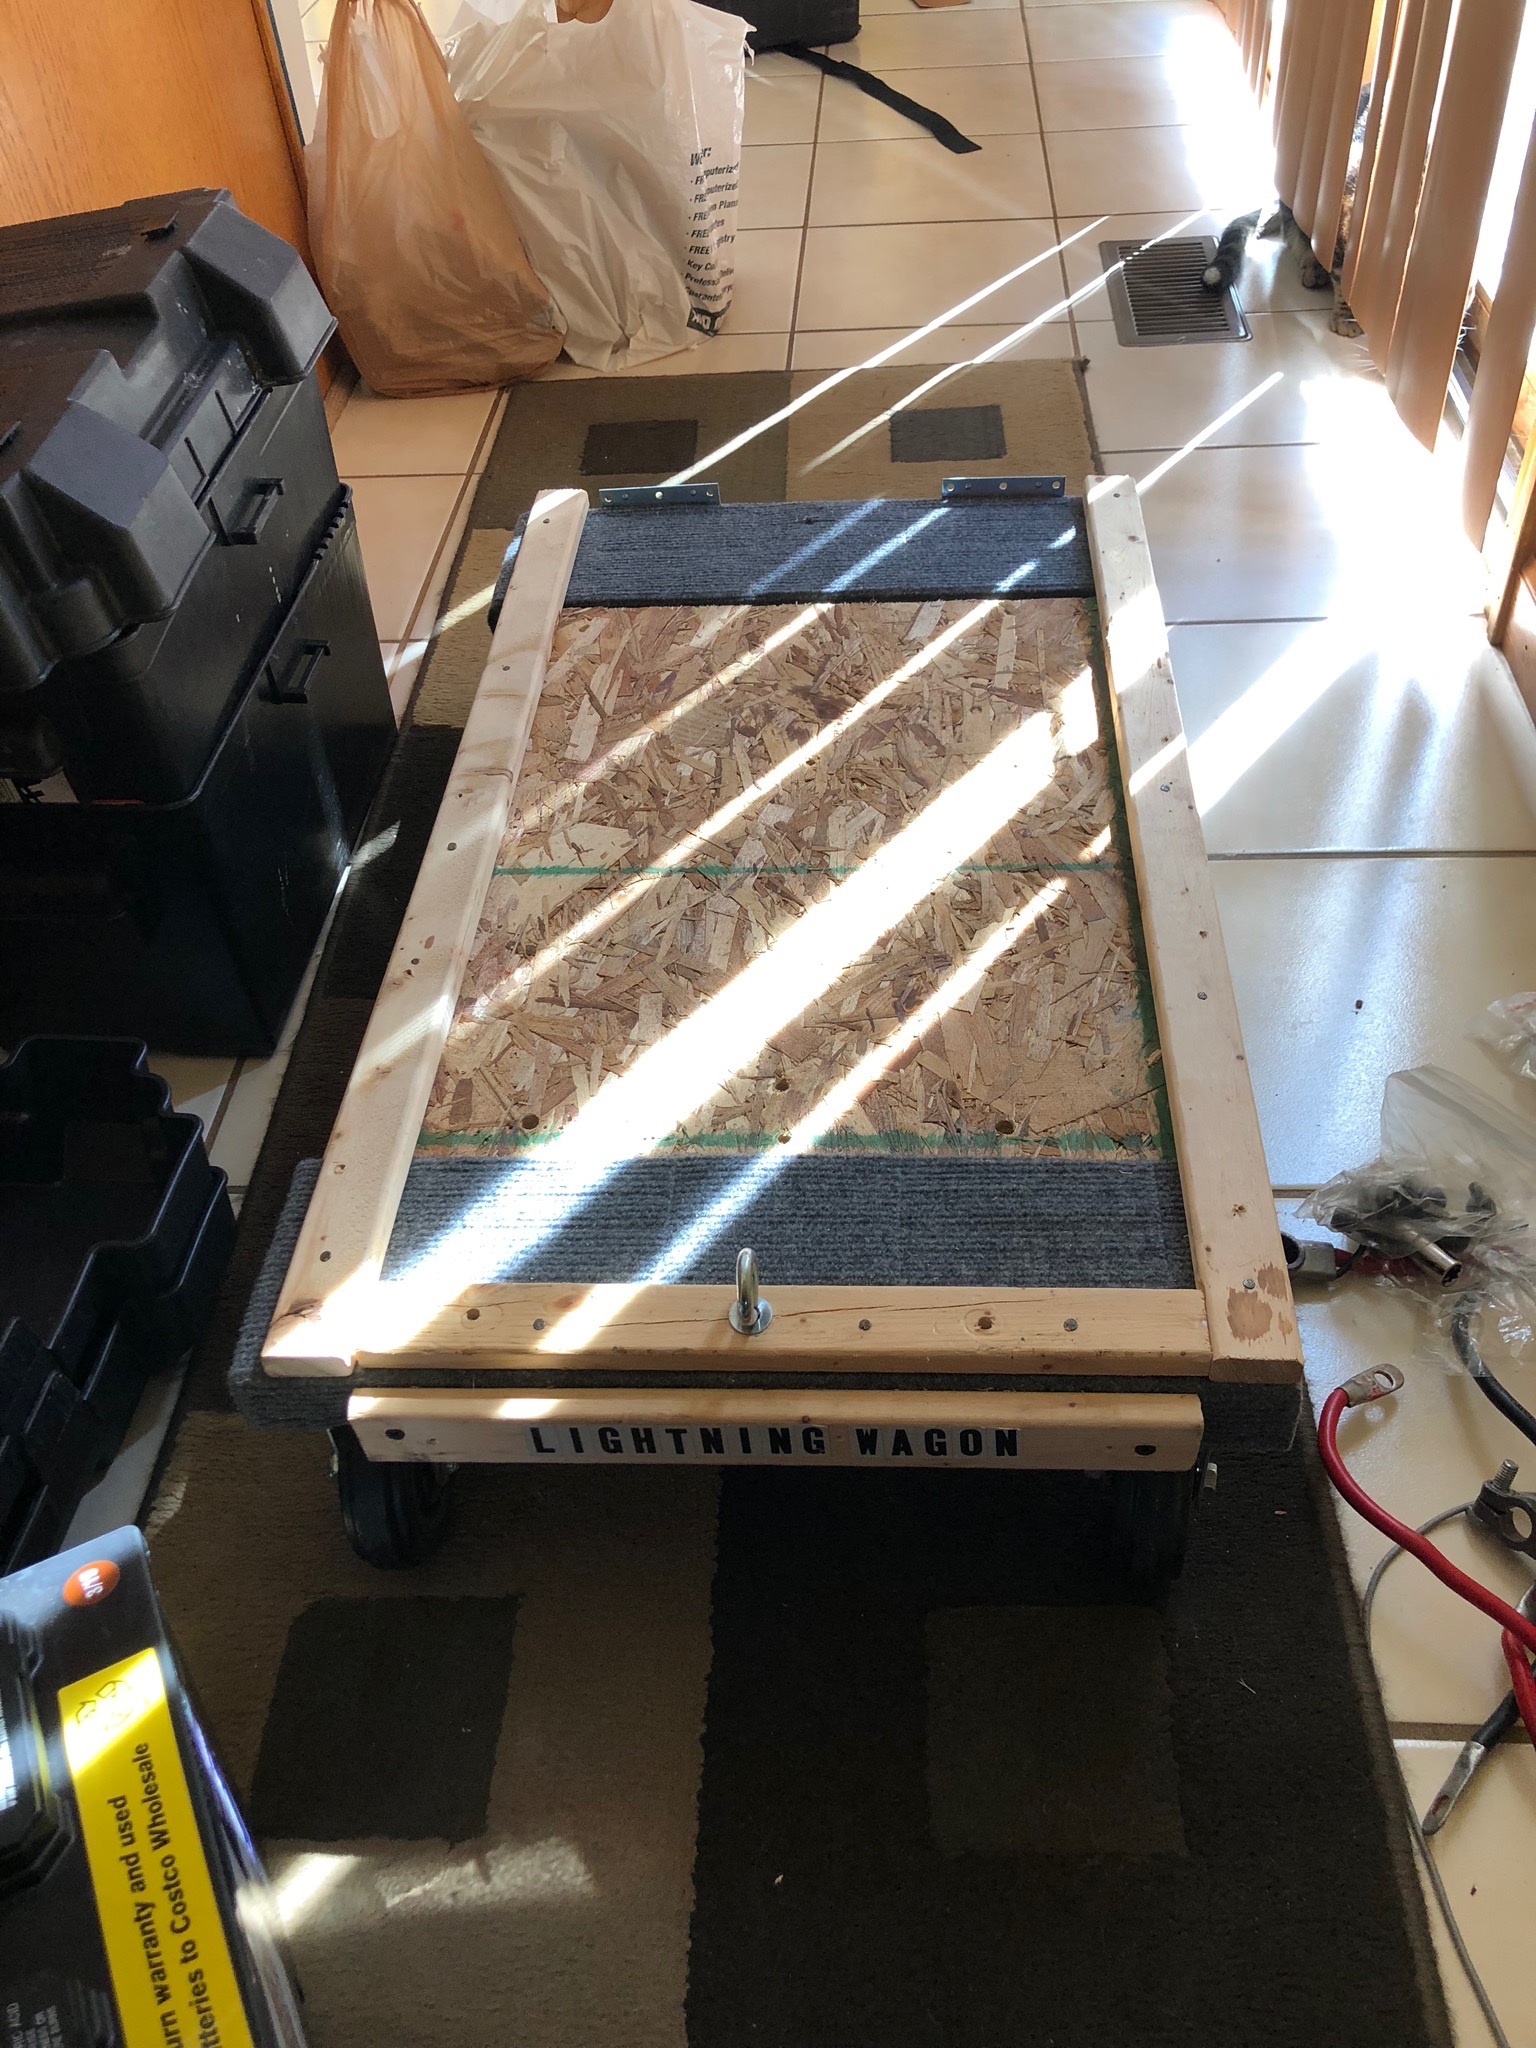
OFFGRIDHAM.COM ORIGINAL PHOTO ©2019
ABOVE PHOTO: The “Lightning Wagon” is a modified furniture dolly. It will hold three 12 volt batteries in plastic cases
Out with the old.
If you have any devices running on solar that cannot be abruptly shut off, gently power them down before doing anything to your batteries.
Disconnect the solar panels from your system, then disconnect the batteries from the controller. In my case, this was a DC buss that is a central feed point for my entire system. If your system can still stay powered up via a battery combiner or second string of batteries, then reconnect the solar panels at this time.
Inspect your storage batteries for leaking fluid or other hazards. Resolve these hazards before proceeding.
Disconnect the individual storage batteries from each other. I’ve found that removing all the positives first, or all the negatives first, makes it easier to keep track of your cables and hardware. The cables and hardware can be reused if they’re not damaged. A cordless impact driver is ideal for quickly and easily removing nuts and bolts. Inspect all everything and replace as needed.
Once all the storage batteries are free, remove them and set them aside.
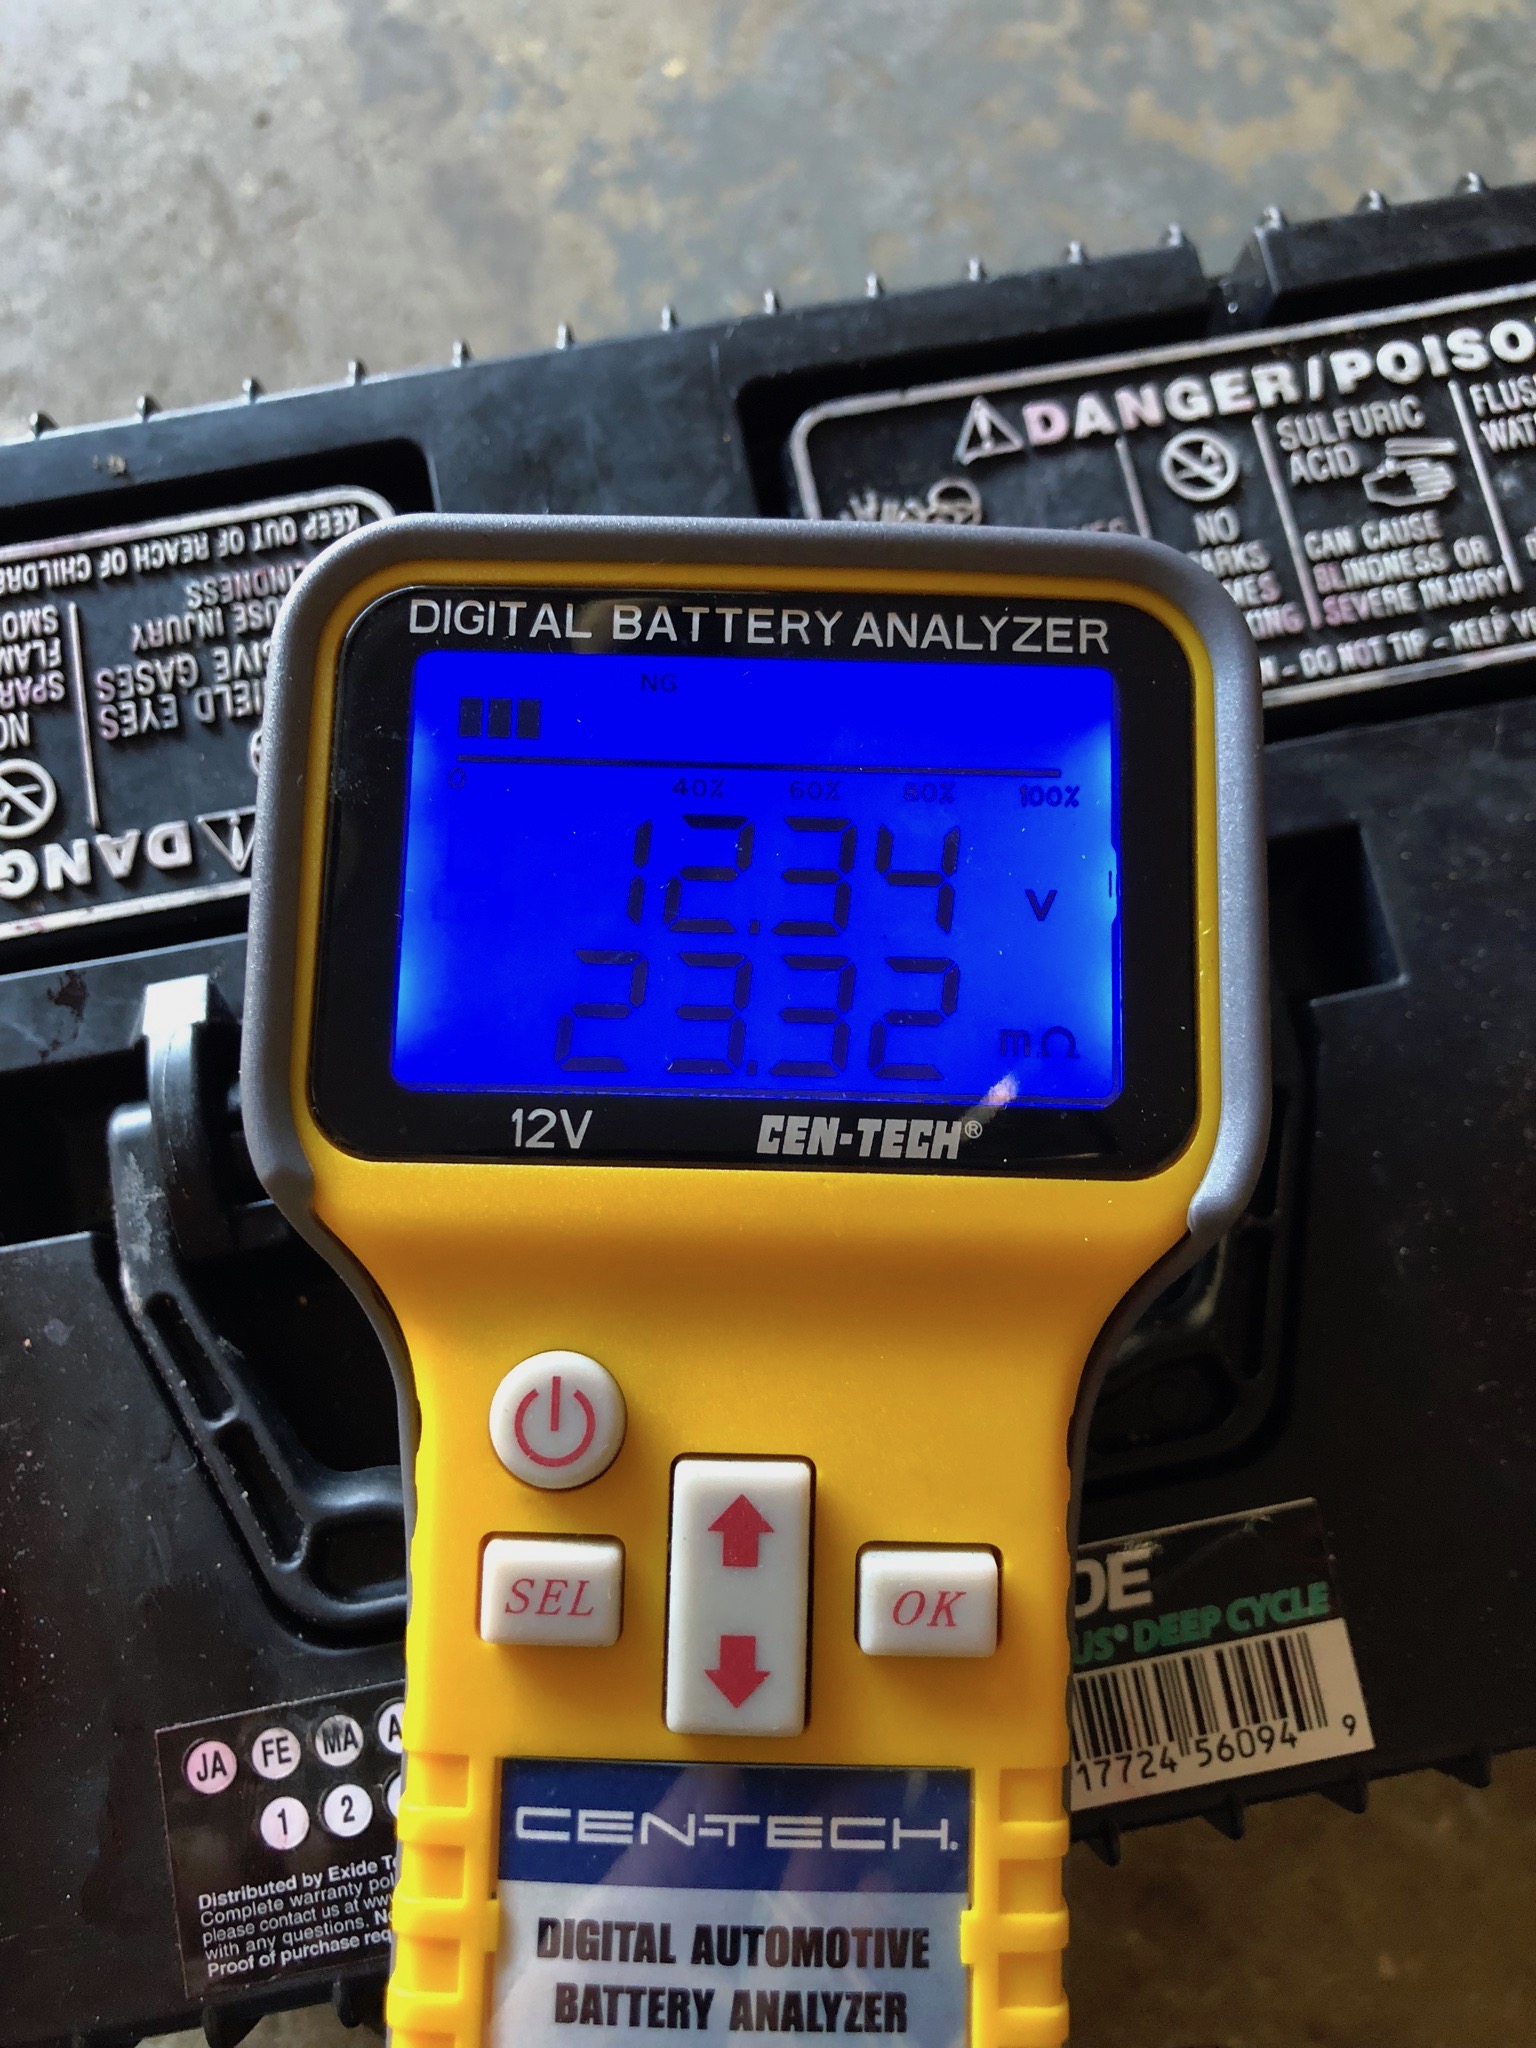
OFFGRIDHAM.COM ORIGINAL PHOTO ©2019
ABOVE PHOTO: This battery will not charge past 12.34 volts and has less than 20% of its capacity left. The internal resistance of 23.32 milliOhms is more than double the acceptable limit of 10 milliOhms. This battery is way beyond dead!
In with the new.
This is a good time to clean up the battery area. When I pulled my batteries out, I discovered a lot of dust, bits of plastic, wire clippings, and other debris on the Lightning Wagon. A quick run with a vacuum made it right. You’ll also want to start with all the batteries fully charged. If needed, fill them up with a conventional charger.
Set the new storage batteries in place and be mindful of where the positives and negatives are. If you have a battery analyzer, run a test on each battery and record the results. This will give you a baseline performance metric when maintaining your batteries in the future. The most important test metrics for now are battery capacity and internal resistance, which is independent of state of charge. A good flooded/wet cell battery should have an internal resistance less than 10 milliOhms, and a new battery would ideally be under 5 milliOhms. The table below shows the test results for my new batteries as they came from the store. As you can see #1 and #3 were topped off and ready to go; #2 was just a few hundredths of a volt short of a full charge:

OFFGRIDHAM.COM ORIGINAL GRAPHIC ©2019
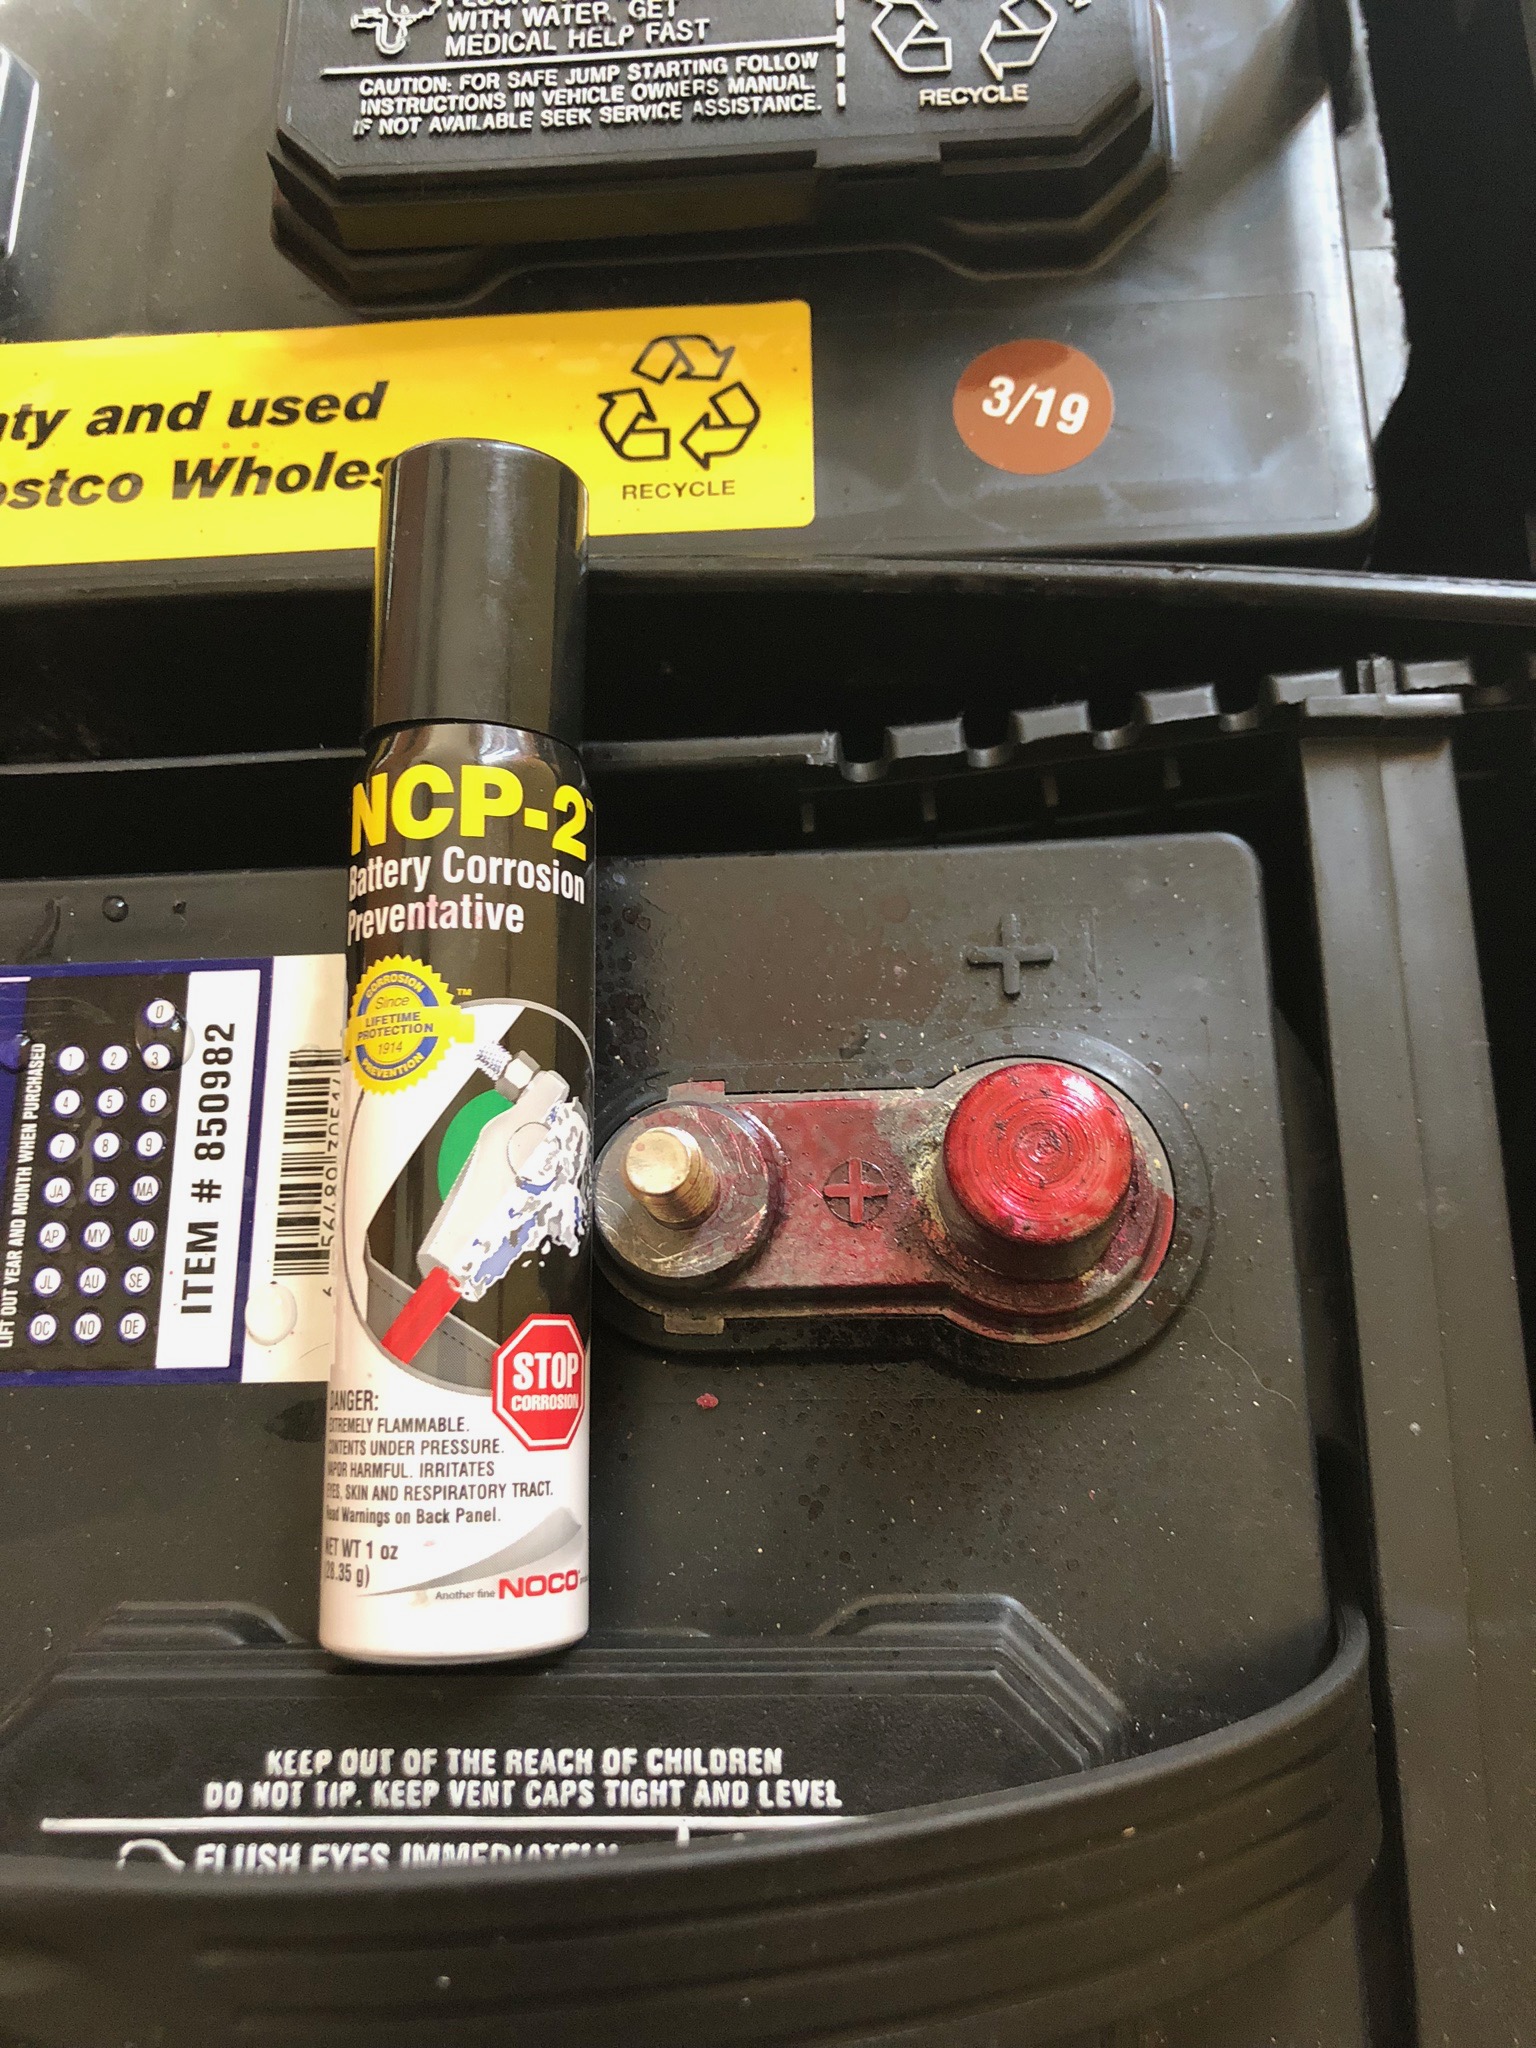
Use a wire brush to clean the storage battery terminals, the contact points on the cables, and any hardware you are reusing. Everything should have a shine to it. Next, spray each battery terminal with anticorrosive compound (available at any auto parts store). It’s not necessary to completely coat all exposed metal. A few spritzes will do.
OFFGRIDHAM.COM ORIGINAL PHOTO ©2019
Attach your interbattery connecting cables. A cordless impact driver is very handy for tightening bolts, but use a light touch on the trigger. It does not take much to strip or shear off a battery terminal with an impact driver. There is no need to tighten the hell out of them. Give the finished connections another shot of anticorrosive compound.
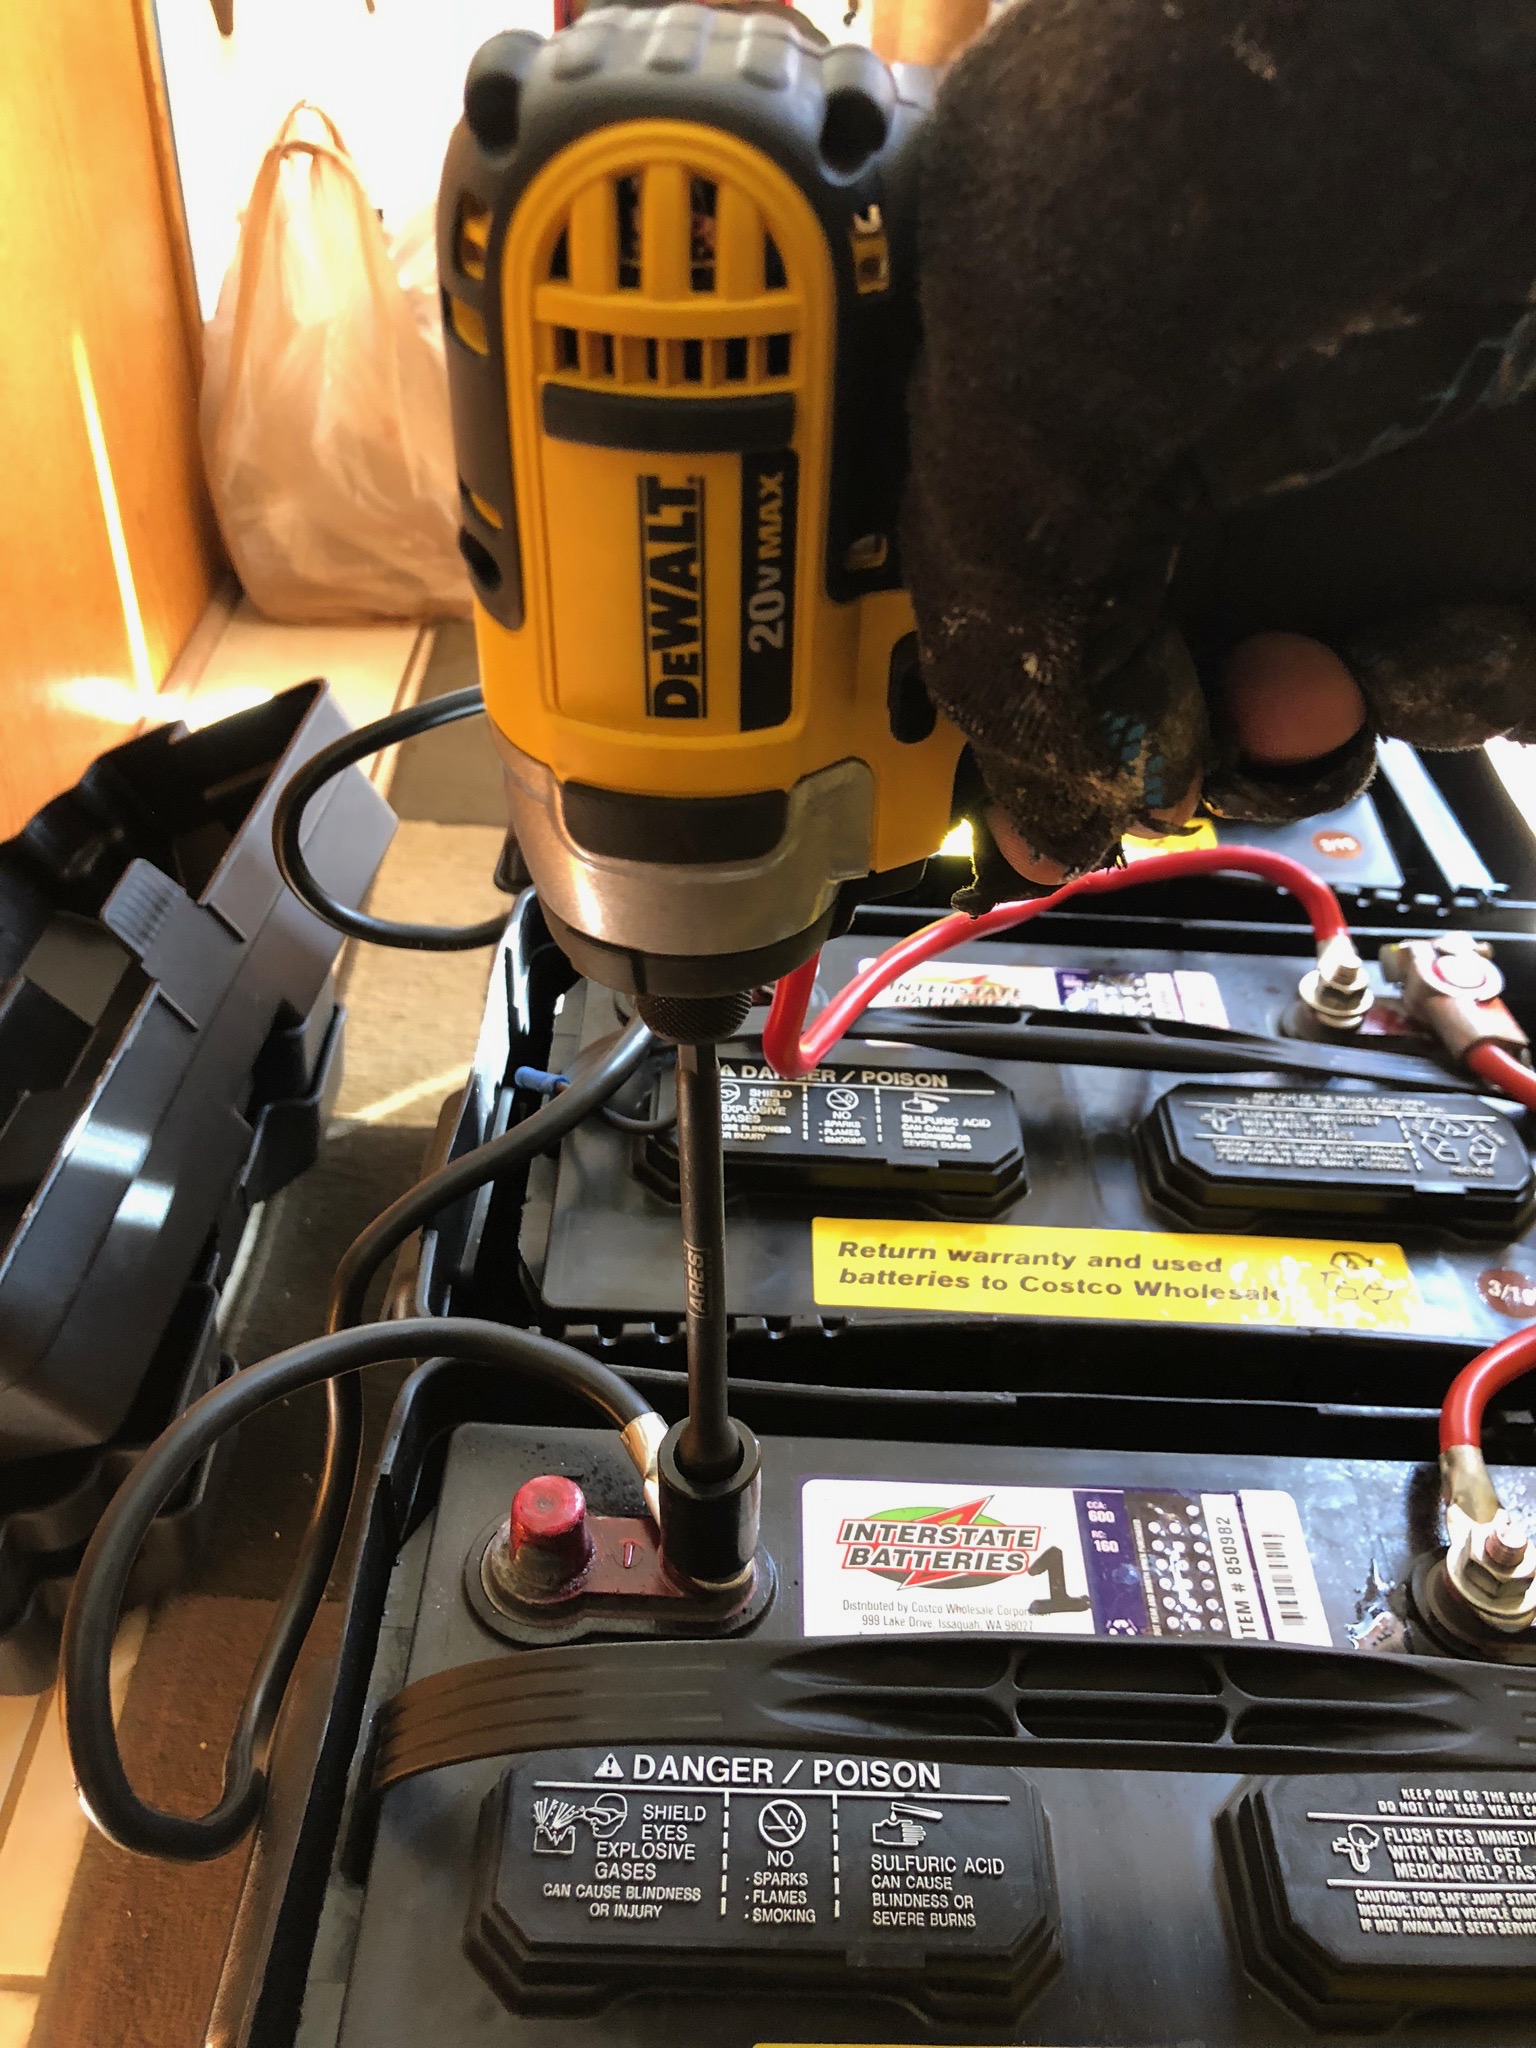
OFFGRIDHAM.COM ORIGINAL PHOTO ©2019
ABOVE PHOTO: An impact driver makes terminating wires a breeze, but go easy or you will strip/break something!
Going back on line.
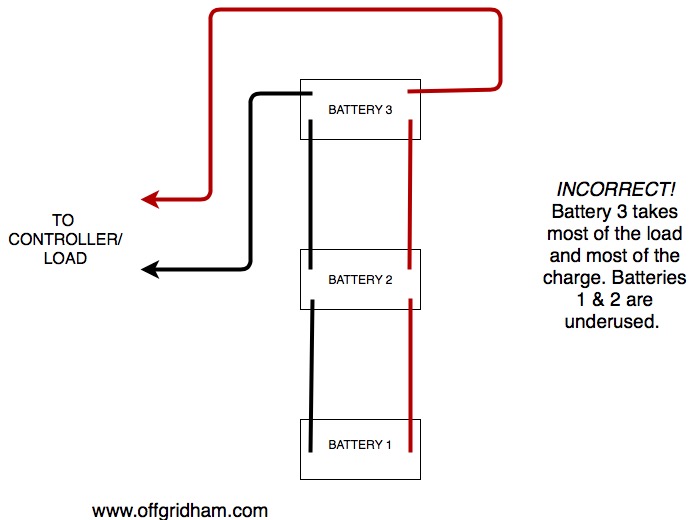
Once the preliminary cabling is done, we’re ready to place the new storage batteries in service. It’s important to pay attention to how you connect your battery bank to your solar power system.
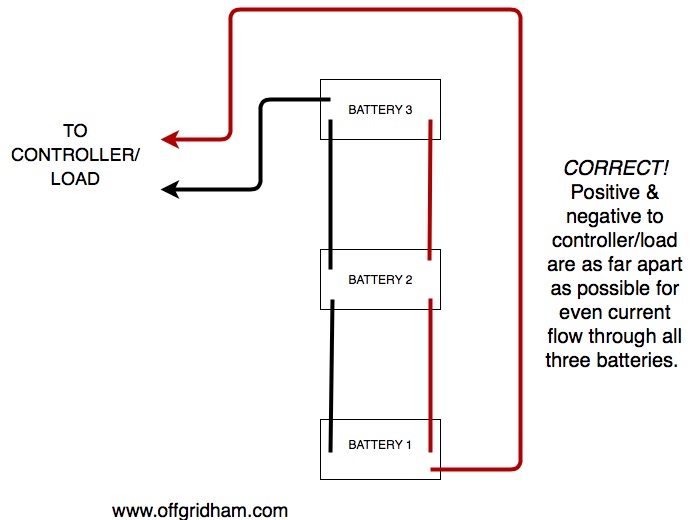
OFFGRIDHAM.COM ORIGINAL GRAPHIC ©2019
OFFGRIDHAM.COM ORIGINAL GRAPHIC ©2019
The positive and negative wires from the battery string to the controller (or load) should be as far apart as possible. This forces current to flow evenly through all the storage batteries. Never connect both of your main output DC cables to the same battery, and preferably not to two adjacent batteries (unless of course, you only have two batteries!). Although it will technically work, it will cause one or more batteries to take most of the load and result in uneven battery wear and charging.
First, check your voltage across the points that will feed the controller/load. You should have 12.50-14.00 volts.
Next, disconnect the solar panels if they are not already. Verify everything one more time, then connect your new storage batteries to the system. Reconnect the solar and any loads.
Your system should now be up and running. The storage batteries should be pulling very little current because you charged them before installation. Monitor the system for the next half hour or so. Be on the lookout for funny smells, overheating, and unusual noises. If all is well, then you’re done!
Avoiding problems & setbacks.
As they say in the Boy Scouts, Be Prepared! Have all your tools and materials ready before your begin. Keep a stock of extra connectors, wire, fuses, and anything else you might unexpectedly need. Nothing sucks more than stoping everything to run to the store for a small part you should have stocked in the first place! If you are in a SHTF situation, there may be no stores! Then what?
A lot of the success of off grid amateur radio comes from simply being organized and having access to what you need without having to run around.
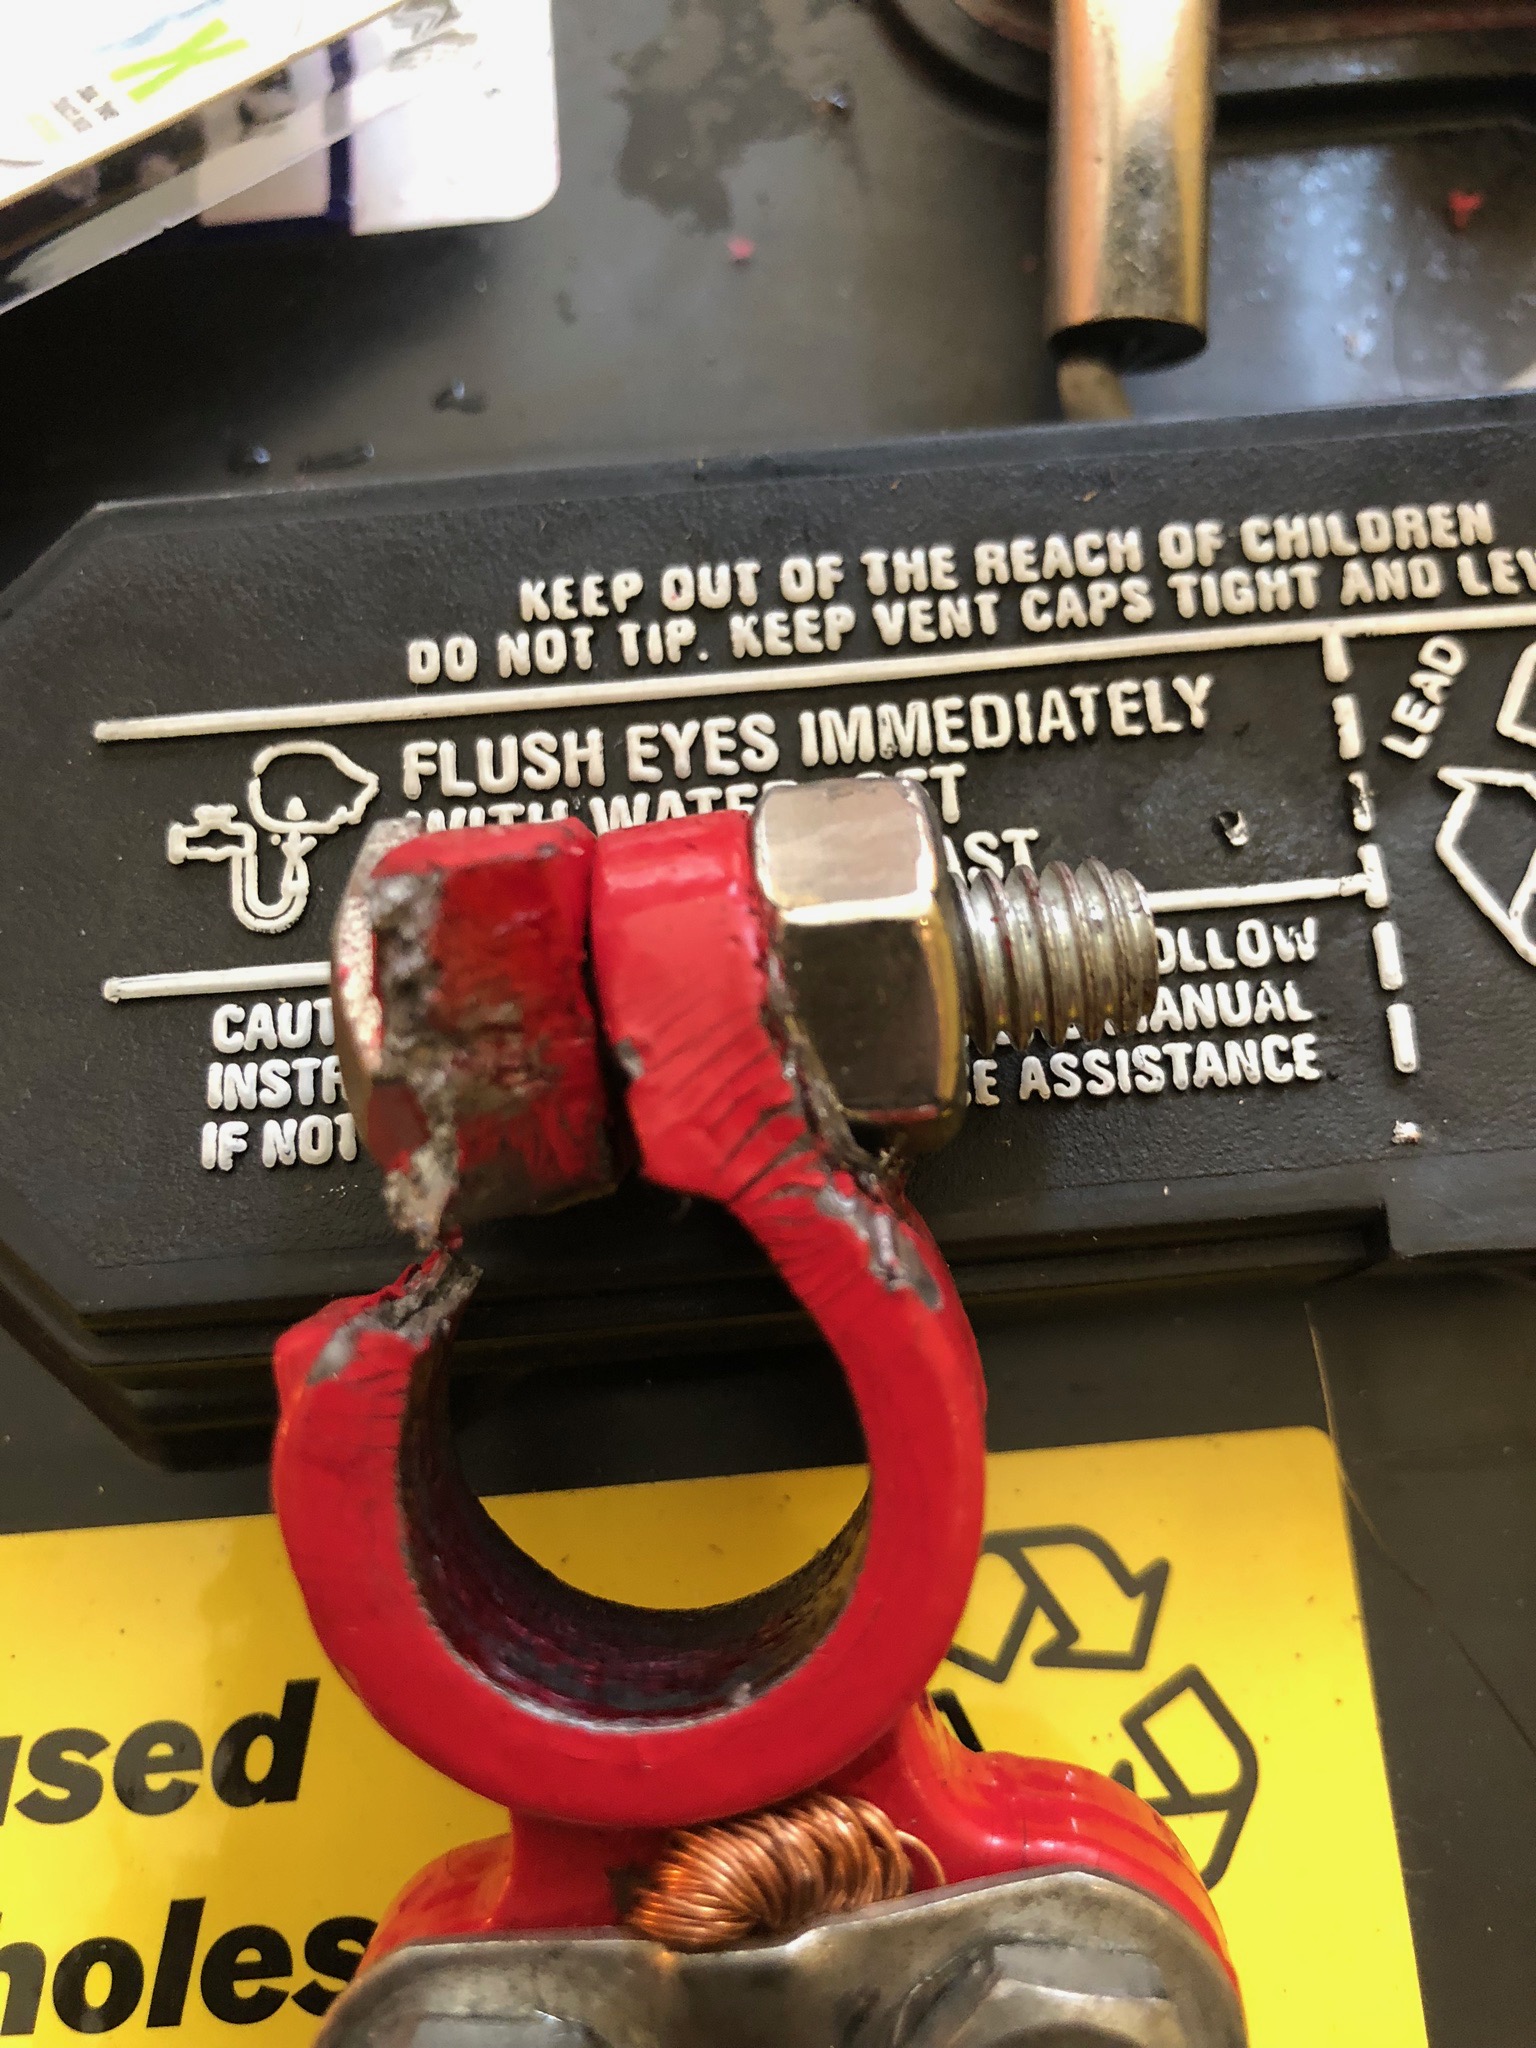
OFFGRIDHAM.COM ORIGINAL GRAPHIC ©2019
PHOTO ABOVE: This connector broke when I tried to tighten it onto the new battery. Luckily, I had extras in my battery kit. The part was replaced within minutes and the job moved forward.
What we learned today.
- Storage batteries are the weakest link in any off grid system. They have a very short service life compared to other equipment.
- Keep the area around your batteries clean and free of unnecessary junk./li>
- Batteries should be fully charged before installation.
- All conductive surfaces should be cleaned with a wire brush or similar abrasive.
- Use anticorrosive compound on battery terminals.
- If using a power impact driver, be careful not to over tighten nuts and bolts.
- Be prepared. Have everything ready before you begin. Have a supply of spare parts.
Thanks for the proper wiring diagram. Looks like I have been doing it wrong for years.
I’m glad to help! As I mention in my article, doing it “wrong’ will still work, but it’s not a good use of all your battery capacity.
Side note: I used to have a supervisor at the school district who simply couldn’t understand the difference between different battery types and capacities. He replaced the two 6V deep cycle industrial batteries in one floor scrubber with a single, 12V car battery. He figured 12 volts was 12 volts and thought the supplier was trying to rip him off because a 12V car battery was about less than a third of the cost. Of course the scrubber only ran about a quarter of the amount of time it was supposed to, and since he used the original charging system, it boiled over the battery every time it was plugged in. He was lucky it didn’t blow up and hurt someone. He absolutely refused to admit he was wrong. He blamed the crew for doing something wrong, blamed the battery, blamed the charger, blamed the scrubber. Sigh…
A Hydrometerr will tell you al lot about your batteries
100% correct, sir. Hydrometers have been extensively covered on this blog. Hams who use flooded batteries should absolutely own one of these inexpensive tools.