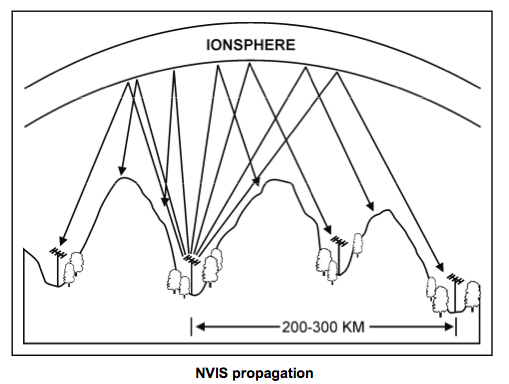
One of the big thrills of amateur radio is working DX. There’s a lot of excitement in contacting that “Holy Grail” station on the other side of the world and earning bragging rights on local FM repeaters. But crisis communications necessitate that amateur radio operators trade DX glory for close to home practicality. That means implementing NVIS, or Near Vertical Incidence Skywave.
NVIS is a transmission technique that allows for HF communications in the otherwise “dead zone” of 50-500 miles that is too far for VHF/UHF FM simplex, and too close for DX. For emergency & disaster purposes, DX is not particularly essential or even desirable. When Shit Hits The Fan (SHTF), you are not going to care about being able to talk to Australia, or even the other side of the USA. Most of your concern will be your immediate area, and extending outward, your geographic region.
There are already a bazillion articles and websites dedicated to the math & science of NVIS. I don’t think I can add anything new to the vast body of existing technical knowledge, so I won’t get into it here. Instead, I’ll talk about why NVIS is important and how you can get started using the HF gear you already own.
NVIS works on the principle that an HF signal will not skip as far if it hits the ionosphere at a high angle close to 90º (that’s where the “near vertical” part comes in). If you throw a rubber ball onto the floor at nearly a right angle trajectory, like when dribbling a basketball, it will bounce vertically but not travel very far horizontally. Likewise, if you throw a ball at an low angle in relation to the floor, like when pitching a baseball, it will travel and bounce a considerable horizontal distance away from where you were standing when you threw it. The basketball example is how NVIS works compared to traditional DX.
A serious DXer will prefer a beam antenna as high up in the air as possible. Meanwhile, NVIS works best when the antenna is at a low elevation, and an elaborate beam and rotator arrangement is not needed. An NVIS antenna in its simplest form is a dipole 0.1-0.25 wavelengths from the ground. On 40 meters that comes out to only about 13-32 feet.
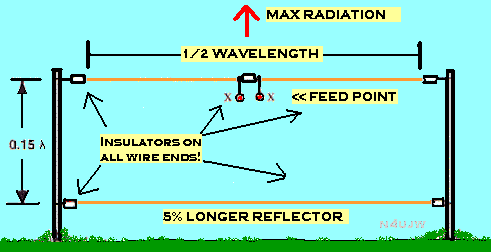
There are antennas specifically designed for NVIS, but most hams use a basic dipole with great success. Photo 1 below shows a super simple NVIS purpose built antenna. It is essentially a two element beam pointing straight up. How high the bottom element (the reflector) is from the ground can be as little as a few feet, which still leaves enough room to keep the total height to no more than thirty or so feet. This is easily doable even as a temporary/portable configuration.
There are other benefits of NVIS: If your antenna is deliberately set up to be not very good at transmitting DX, then it follows that the antenna cannot receive DX very well either, thereby creating a built in interference reduction effect. There is also much less signal fade because the short near-vertical path the signal takes into the ionosphere presents a smaller window of opportunity for solar activity and the D-layer (which attenuates RF) to mess with it. The resulting high signal-to-noise ratio inherent to NVIS is ideal for QRP because there is less interference for weak transmissions to compete with. A QRP station can make efficient use of the few watts it has and sound a lot more powerful than it actually is.
NVIS is also not as effected by surrounding terrain, so if you are in a low area or valley, it’s not a problem. And of course, the low antenna elevation is easy to achieve. Hang a dipole on any tree and you can be running NVIS in literally minutes. If your home station has a 40 or 80 meter antenna below 35 feet due to physical limitations and you never seem to bag any DX, you may already have the perfect NVIS setup and not even realize it.
Near Vertical Incidence Skywave does have some quirks that need to be worked around. Ideally, both stations should have antennas set up for NVIS operation. Also, because NVIS is rarely effective above 10.000 mHz, you may be stuck with an antenna bigger than desired, particularly when running portable. Lastly, frequency selection is important. Optimal communications effectiveness will be at the critical frequency. Critical frequency is defined as the maximum frequency at which the F-layer will return a signal radiated at a 90º angle of incidence. There are numerous on line RF propagation forecast resources that can help you determine critical frequency.
For an off grid or disaster/SHTF application, you will not likely have the benefit of the internet to help you pick a frequency. In that case, you’ll have to rely on your wits and good old trial and error. In survival scenarios where you are coordinating with other stations, having a prearranged list of frequencies and a contact schedule is a must. My own experience is that 40 meters is good for NVIS almost any time of the day or night.
NVIS requires a bit of finesse to use successfully so it’s important to practice under the real-world conditions you expect to need it for. Everyone has different goals and challenges; for my purposes that means regularly taking my gear out in the field and setting up a portable station. There is no need to wait for Field Day or other organized events. Training can and should be done regularly. Save your pursuit of DX adventure for another time. Amateur radio operators concerned with crisis communications must master NVIS.


Pingback: ETH088 - Near Vertical Incedence Skywave (NVIS) - Everything Ham Radio
I realize this is an old post, but NVIS is something I’ve been interested in since first hearing about it. I just passed the General exam a couple of weeks ago, and I’m saving for an HF rig (the Yaesu 817ND is the front runner so far). I have enjoyed all your articles, as QRP/Off-Grid ops seem very relevant in unsettled times.
I’m glad you enjoy Off Grid Ham, Mike. Keep experimenting and always strive to do better!
Maybe you can answer a question for me.
I am thinking about a dipole (maybe a fan dipole) for NVIS. Fortunately, our property is large enough that I could put up a dipole for 160m.
The property is cross-fenced with woven wire fence about 3 feet high. Would this be a good reflector under a low dipole, say about 20 feet up?
Thanks;
Mike
Hi Mike. It’s hard to predict how an antenna will act under any given condition. It will not hurt anything to give it a shot and see what happens. I think a 160 meter dipole at 20 feet will work well for NVIS without any extra hardware.
More directly to your question, adding a passive reflector in the form of a metal fence will not likely help you get to your goal and has the potential to make things worse. If you do try this, make sure the dipole runs parallel to the fence, or at least within a few feet of directly overhead.
Thanks for stopping by Off Grid Ham. I hope you’ll come back again soon!
Thanks for the reply. I will probably try a single band dipole first, just to see if it works.
DESERT VALLEYS DAYTIME NET
revised 13NOV17
High Frequency communications for the desert valleys east of the Sierras. Listen for HF packet/data beacons on one of the
following frequencies: 1990 KHz, 3990 KHz, 7290 Khz from
sunrise to sunset. If signals are heard the frequency could be usable for voice (LSB), code (CW), and packet (DATA) comms. The DESERT VALLEYS DAYTIME NET uses the NVIS mode (Near Vertical Incident Skywave) in which operations are generally less than 300 miles and signals are transmitted directly overhead and reflected back into valleys whose mountains block VHF signals. The DESERT VALLEYS DAYTIME NET’s service area includes western Arizona, southwest Utah, southern Nevada, central and southern California. Better results come with fixed stations using low dipole antennas over a wire reflector on the ground and low end fed temporary wires for portable operation. Mobile operations are possible with small magnetic loop antennas.
Call on the active frequency, establish contact, and change frequency (QSY) for conversation (QSO). Use 146.52 MHz (national calling) or the DVDN 2M coordination frequency of 145.52 MHz for shorter distances.
Visit http://www.sws.bom.gov.au/HF_Systems/6/5
for current propagation/conditions if available.
HF packet linked to VHF packet on 145.090 MHz near Ridgecrest, California.
For suggestions and net operation write Bitzer/NL7SX, POB 606, Inyokern, CA 93527 or email DVDN@USA.COM
I have an Alpha Antenna Pro Master Sr and it comes with 4 NVIS elements and is about 18′ when fully extended. Would adding an additional 4 more elements (for a total of 8) help? Also they recommend installing the base at 6-7 feet off the ground. I’ve read these lower mountings reduce noise. Would you still recommend raising the base?
Hi Wade, the “NVIS elements” in your antenna are really just ordinary ground plane/counterpose wires. Why Alpha doesn’t just skip the technogibberish and call them what they are is lost on me. I hate it when companies use nonsense, made-up marketing lingo.
Anyway, Adding more “NVIS elements” will theoretically improve antenna performance. Whether the performance increase justifies the extra weight, space, and set up time is your call to make. I generally do not recommend adding anything to a factory made antenna that did not come with it, but at the very least your idea will not make anything worse. As a matter of principle, an antenna that costs $400 should not need any “basement engineering” to make it better.
As for raising the base, it would depend on what you want to do. If you want to run NVIS, then keep your antenna on the stock base. If you want DX, then get that antenna as high as you can, 40 feet or more. Raising it to some intermediate elevation, say, 20-25 feet, doesn’t give you better NVIS or true DX. Basically what I’m saying is, if you can’t get it to at least forty feet then you may as well leave it at six.
Thanks for visiting Off Grid Ham Wade. I hope you’ll come back soon.